Millipede cluster user guide: Logging in
Since the login procedure for Windows users is rather different from that for Linux users we will describe these in different sections. Logging in from Mac OS X is also possible using the Terminal, but this is not further described here.
If you need assistance with logging into the system, please contact the CIT central service desk.
General information
The hostname of the system is millipede.service.rug.nl. The system can be reached through ssh.
Windows
Available software
Windows users will need to install SSH client software in order to be able to login into the cluster. The following clients are useful:
PuTTY+ WinSCP
PuTTY is a free open source SSH client. PuTTY is available on the standard RUG Windows desktop. If you are not using this, PuTTY can be downloaded from
http://www.chiark.greenend.org.uk/~sgtatham/putty/download.html
For most users, getting and installing the installer version is the easiest.
A free open source file transfer utility is WinSCP. This utility is also available on the standard RUG Windows desktop. It can be downloaded from:
http://winscp.net/eng/index.php
Optional: X-server
For displaying programs with a Graphical User Interface (GUI) an X server is needed. A free open source X server for Windows is Xming. Xming can be downloaded from: http://sourceforge.net/projects/xming
Using the software
PuTTY
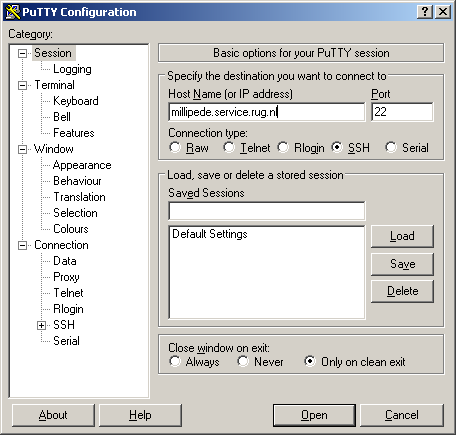
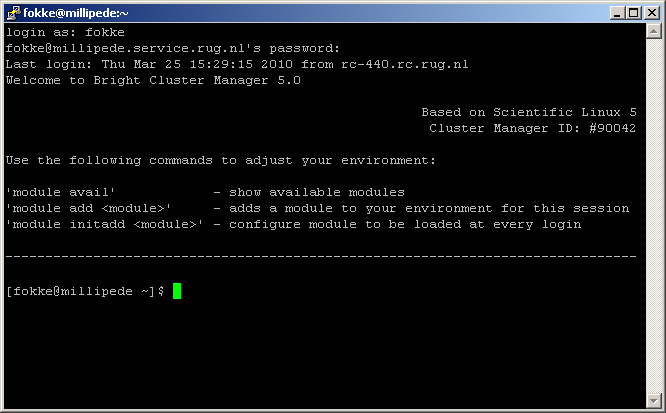
After connecting PuTTY will open a terminal window ( Figure 3 ). Here you first will have to enter your username, followed by the password. You should have obtained the username and password from the CIT Service Desk when applying for an account.
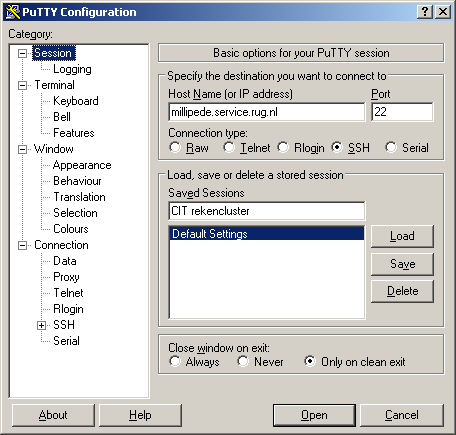
In order to prevent some work when logging in the next time it is possible to save your session. This will store the preferences you made when connecting in a session, which can be used to easily reconnect later on. In order to save your session (see Figure 4 ) you have to enter a name in the “Saved sessions” box at the PuTTY startup screen. If you then click “Save” the settings you have supplied like “host name” will be saved in a session with the given name. You can of course also change the “Default Settings” session.
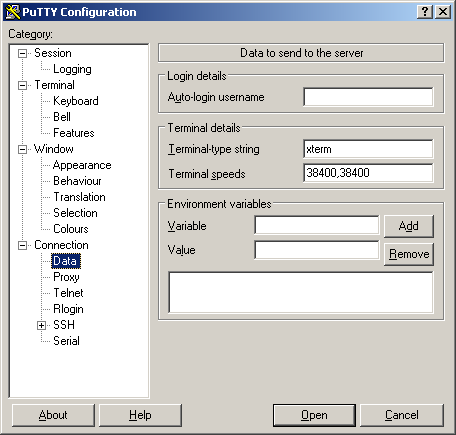
Supplying a standard username is one of the things that can be very useful, especially when saved in a session. The username can be supplied when selecting Connection → Data in the left side of the window ( Figure 5 ).
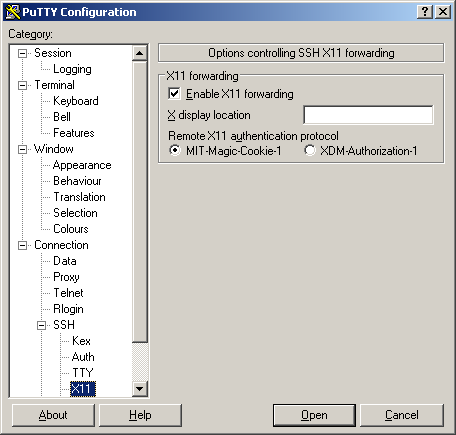
Some programs may want to show graphical output in e.g. a graphical user interface (GUI). On Unix systems the X11 protocol is commonly used to draw graphics. These graphics can be displayed on remote systems like your desktop machine. For this an X-server program needs to run on your desktop (see the section on Xming, further on for more details). Normally X11 traffic goes unsecured over the network. This can lead to various security problems. Furthermore network ports would need to be opened up on your machine. Fortunately tunneling X11 connections over ssh solves this problem, it also makes displaying programs easier because no further setup is necessary. In order to enable tunneled X11 connections the checkbox “Enable X11 forwarding” shown in Figure 6 has to be set. This checkbox can be found at Connection → SSH → X11 in the left hand side of the window. Note that it is easiest to save this in a profile so that it is always on.
WinSCP
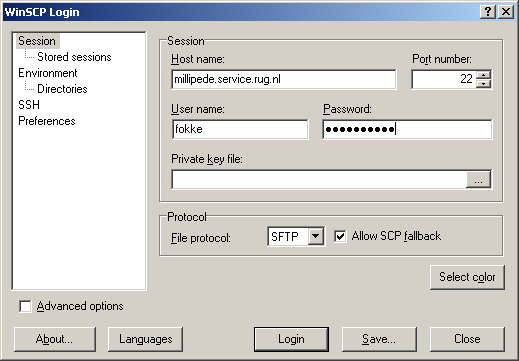
When starting up the file transfer client WinSCP, you will be presented with the screen shown in Figure 7 . You will have to enter the machine name, username and password here in order to make a connection to the remote system. Is is also possible to save this input into a session. Note that you should NOT save your password into these sessions!
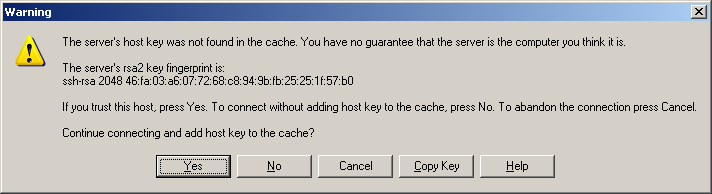
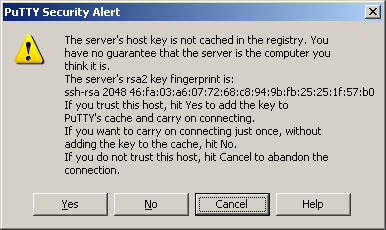
When connecting to a machine for the first time the host key of this machine will not be known to WinSCP. It will therefore offer to store the key into its cache. You can safely press “Yes” here ( Figure 8 ).
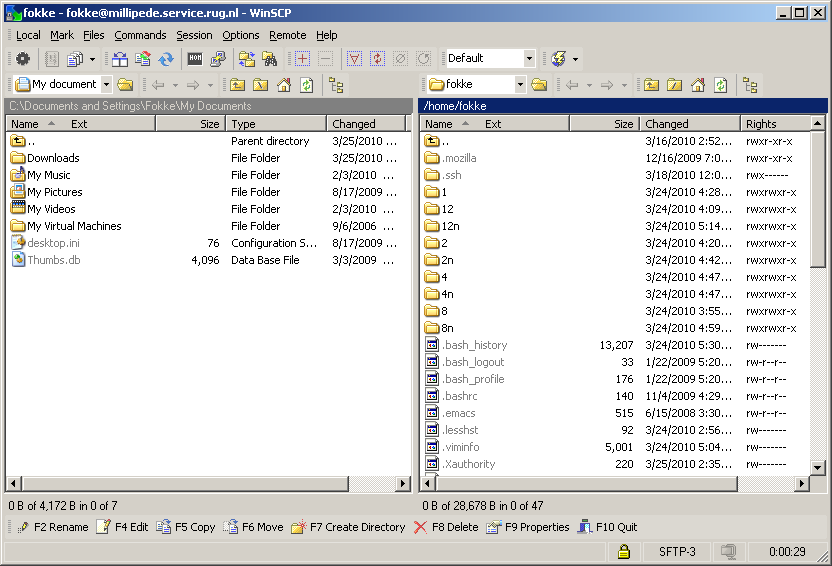
After the connection has been made you will be presented with the file transfer screen ( Figure 9 ). It will show a local directory on the left side and a directory on the remote machine on the right. You can transfer files by dragging them from left to right or vice-versa. The current directory can be changed by making use of the icons above the directory info screens.
Xming
To be able to run programs on the cluster that display some graphical output, an X-server must be running on your local desktop machine. Xming is such an X-server and it is open source and freely available.
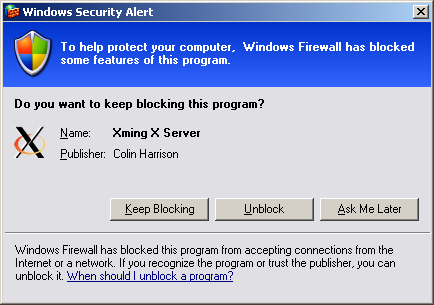
When starting Xming for the first time, Windows may ask you if it should allow Xming to accept connections from the outside ( Figure 10 ). Since you should always use tunneled X11 connections Xming does not have to be reachable from the outside. So answer “Keep blocking” when presented with this dialog.

When Xming is running it will be able to show graphical displays of programs running on the cluster. This under the provision that you have enabled X11 Forwarding on your SSH client (like PuTTY). When running, Xming will show an icon with an X in the system tray (Figure 9).
Note that transferring this graphical data requires some bandwidth. It is therefore only really usable when connected to the university network directly. When using this at home you may notice that the drawing of the windows is very slow.
Note that the following problem described by Chieh Cheng exists when running Xming under Windows Vista .
For Xming to work correctly the localhost entry must be available in the hosts file (%SYSTEMROOT%\System32\drivers\etc\hosts, where %SYSTEMROOT% is normallyC:\Windows). It must contain the entry “127.0.0.1 localhost”. On Vista it only contains the entry “::1 localhost”, which is for IPv6 instead of IPv4.
When the correct entry is not present, you will get "X connection to localhost:10.0 broken (explicit kill or server shutdown)" errors when you try to launch an X client application.
Linux
For Linux distributions all necessary software should already be included. A connection to the cluster can be made from a terminal window. The command to login is then:
$ ssh -X username@millipede.service.rug.nl
Here username should be replaced by your username. After that you should give your password. The “-X” option will enable X11 Forwarding, which is necessary to be able to display graphical output from programs running on the cluster. Note that this option may be the default setting on your system.